Introduction
Hi Everyone,
This post is about me creating an unmanaged dll, which I managed to use in AutoIT for comparing two images/screenshots. At the time, I did not realise AutoIt had GDI+ library and when I did find it; I wrote some test to see if the functions _GDIPlus_BitmapGetPixel and _WinAPI_GetPixel works. However, it didn't (most likely I did something wrong).
Secondly, it made so much easier to debug my code.
What's the reason of building this?
The reason for this was to benchmark/time Citrix applications. The issue is since the application is running inside Citrix; Using the AutoIt Info Tool did not identify any controls on the application. Other than the function WinWaitActive, other function such as WinGetState or ControlGetText won't work.
To get around this issue, I take screenshots of how the form (or a certain part of the form) should look like after completing a action/task (the end result capture). And when AutoIt is running its automation process (for example, I input a value in one field and wait for the other fields to prepopulate the information).
I use the _ScreenCapture_CaptureWnd function in AutoIt to constantly take screen capture of the form (or a certain part of the form) and keep comparing with the end result capture and time how long it takes the screen capture to be the same as the end result capture.
I use the _ScreenCapture_CaptureWnd function in AutoIt to constantly take screen capture of the form (or a certain part of the form) and keep comparing with the end result capture and time how long it takes the screen capture to be the same as the end result capture.
Where did I get the Image Comparison Idea?
SmartBear is the development company of TestComplete (GUI automation tool). I got the idea from their documentation, titled How Image Comparison Works.
My First Attempt
For my first attempt, I used the OpenCV libraries and built command line interface in C++ that compared two images. The code is pretty straight forward:
- Get the location of the two images you want to compare.
- Compare the images.
- Check if they the same and also output a black/white image of the difference.

Great !!! It works, so why didn't use this? That's because:
- Setting up the solution for unmanaged dll in Visual Studio is painful!!
- Linking the OpenCV libraries to the solution is also painful. Imagine how painful it is finding and copying the header/source files from OpenCV folders into the solution.
- Even if I did not copy the header/source files. I did not want to have to copy/incorporate the OpenCV directory with the dll wherever I ran my AutoIt script/executable.
- Lastly, I needed to create this solution like yesterday !!! 😆 So time was a factor.
My Second Attempt, I promise much more better !!
So for my second attempt, I decided to use C# because I found documentation on the GetPixel function and then decided to do a pixel by pixel comparison.

For testing the dll with AutoIt; I created a form in AutoIt (I know it looks crappy !!) and also used Keepass login screen; Took two screenshots of the same form and then compared it with each other.

Good thing is, it works with the form I used above and also with Keepass Login Screen. Bad thing thing is it didn't work with other applications (in particular the Citrix application I was testing). The reason why it didn't work is because the application incorporates Windows colour scheme/Aero theme.
The problem is with AutoIt is when it takes a screen capture and then stores the image onto disk; It also includes the alpha channel, which is transparency level of each pixel. Meaning pixel from image A is 10% lighter or darker than the pixel in image B or vice versa, therefore the image is not the same.
SmartBear explains further, why the colour scheme is a issue and also other issues in their documentation titled Factors Affecting Image Comparison.
However I got around this, with a little bit of Math 😁.
SmartBear explains further, why the colour scheme is a issue and also other issues in their documentation titled Factors Affecting Image Comparison.
However I got around this, with a little bit of Math 😁.
A little bit of Math (Linear Algebra)
I realised that the RGB colour can also be represented as a 3-dimensional vector.

3D Vector to representing the colour black.
And In the documentation from SmartBear, they mentioned "Color Tolerance":

Intensity also means magnitude; that's when I realised I can use Euclidean distance formula.
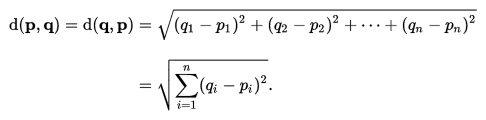
After calculating the magnitude, I'm able to compare if the magnitude is greater than the tolerance I've set (the tolerance is a literal percentage value 10% = 10.0). For example if I am comparing a pixel from Image A with a pixel from Image B and tolerance I've set is 10%. If the magnitude calculated from the Euclidean distance formula is greater than the tolerance then the images are not the same.

Big Oh Notation - Time Complexity
The time complexity of this function is quite bad. The time complexity of the for loops is O(n^2). And after doing it a bit more research on GetPixel function, this also increases the time complexity. According to an article on Code Project, for an image that is 1000 x 1000 pixels, there will be 1 million calls to GetPixel. That's really bad !! So I decided to change my approach a little bit.
Lastly, I did a test run with the above function on a HP T520 thin client; For each comparison it took approximately 2 to 3 minutes !!!!!
Lastly, I did a test run with the above function on a HP T520 thin client; For each comparison it took approximately 2 to 3 minutes !!!!!
My Last Attempt and Improvement/Optimization
When I was researching (or googling) why GetPixel is slow, the first thing I read was an blog from The Supercomputing Blog. Although the code in this article is in C++, the same functions are available in C#. Two things in this article that caught my attention.
- Use LockBits to obtain raw array of data.
- Perform image processing using a standard array.
First thing I realised is that point 2 will definitely decrease my time complexity from O(n^2) to O(n), but the question is how does LockBits work.
LockBits
What I understood from the MSDN documentation is that, LockBits will give direct access and let me manipulate the bitmap in memory. LockBits function also returns a BitmapData object.
Ok great, so how do I get the BitmapData object into an array? By using Marshal.Copy Function (to me it's a fancy version of memcpy from C programming). Using Marshal.Copy, I was able to the BitmapData object into an array of type byte.

And finally, I can do my comparisons !!

As a bonus, the time complexity is now less than O(n); It is now at O(n/3).

I re-ran my script on the HP T520 thin client, and each comparison took less than a second !!
The Improvement/Optimization
Lastly, decided to improve the speed of function with multi-threading, I changed the for loop to a Parallel.For loop.

I re-ran my script on the HP T520 thin client again and couldn't notice a difference 😆.
Unmanaged dll
I downloaded a NuGet package which is called Unmanaged Exports Template. And it was pretty easy to set up. I follow instructions from an article from gamedev.net.
Using the dll in AutoIt
In AutoIt, there's a function called DllCall. The code below is pretty self explanatory.

Final Thoughts
Instead of creating a dll for the image comparison, I would like to recode this entirely in AutoIt to see if there is a performance difference comparing against this dll version I've created.
Anyways, thanks for reading !!!